Science Mom’s 5 Favorite Halloween Projects From Pinterest!
With Halloween just around the corner,
Now is the time to start thinking about fun and exciting projects that you can do with your kids.
Even though the holiday is all about candy and dressing up…
Why not incorporate some science projects into it as well?
After all, the more you make learning fun, the more your kids want to learn.
With that in mind,
We dove deep into the world of Pinterest to find some spooky and spectacular science projects that you can easily do with your little ones.
All you need is some creativity, a few household supplies and plenty of paper towels to clean up afterward (kidding, mostly).
Have a boo-tiful holiday you guys!
1. Boo Bubbles

For a lot of science experiments, there is nothing “cooler” than dry ice.
The way that it creates a spooky mist is ideal for Halloween mixed with science.
As long as you and your little one practice safety procedures, this experiment will be quite remarkable.
Materials:
- Safety Goggles
- Thick Rubber Gloves
- Knit Gloves
- Gallon-Sized Plastic Jug
- Thick Rubber Tubing (three-feet at least)
- Liquid Dish Soap
- Small Plastic Container
For this experiment, you essentially create fog and then trap it in a soap bubble.
While you can find more intricate instructions here, the basic layout is this.
- First, you attach the tube to the jug.
- Drop the dry ice (using safety gear) into warm water in the jug.
- Dip the tube into a soap solution.
- Make foggy bubbles.
2. Layered Halloween Cup
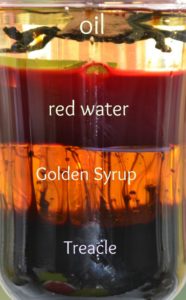
This experiment is a mixture of grossness and fun.
It is remarkably simple to do, and it can help your children learn about the density of liquids and solid objects.
When it all comes together, it looks a little creepy.
For added Halloween themes, place spooky items into the layers and see where they settle.
For example, a fake eyeball or a rubber cockroach would be fun to drop inside.
Materials:
- Glass (start with a shot glass)
- Molasses
- Corn syrup
- Water
- Food Coloring (red ideally)
- Vegetable Oil
The way it works is that you pour the ingredients in one by one.
Ideally, you will start with heaviest to lightest, but the fact is that they should separate on their own regardless.
In fact, pouring them at different times would be a great way to show how density works in action.
Once all is said and done, the layers should form, from top to bottom:
- Vegetable oil
- Colored water
- Corn syrup
- Molasses

3. Glow in the Dark Liquid
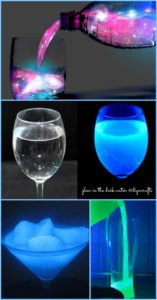
This next experiment is fantastic for a haunted house or another dark and spooky place.
Simply put, you make water that “glows” in the dark.
While this water is not safe to consume, it can bring a little brilliance to your Halloween Party.
The best thing to do is have a reveal by turning off the lights and letting your water shine.
Materials:
- Water
- Non-toxic highlighters
- Black Light
This experiment works by cutting open a non-toxic highlighter so the ink comes out. Pour the ink into water and let it sit for a little while to mix. Once you put the black light up to it, it glows!
Another variation is to use plain tonic water without the highlighter. This glows in the dark naturally, and the best part is that you can drink it. Mix and match different colors to get cool effects!
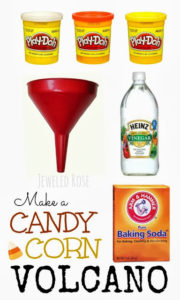
4. Candy Corn Volcano
Even though it seems no one likes them, everyone gets candy corn for Halloween.
Nonetheless, the candy is symbolic of the holiday, which means that you can make anything that looks like candy corn and it will scream Halloween (not literally, though, that would be creepy).
Materials:
- Play-Doh (orange, yellow and white)
- Funnel
- Baking Soda
- Vinegar
- Squirt Bottle
If you’ve ever created a homemade volcano before, then you know how this all works.
The only difference is that you’re making the volcano out of Play-Doh, and it will look like a rather large piece of candy corn.
Under the volcano, put a container with baking soda. Use a squirt bottle to hold vinegar, and then pour it into the center.
Voila!
5. Brain Surgery
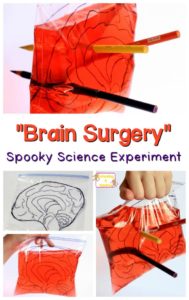
This is another super simple experiment.
All it takes is a little artistic skill, some extra-sharp pencils, and a whole lot of (fake) blood.
Essentially, you teach your kids about polymers and sealing, all while stabbing a homemade fake “brain” to death.
Science!
Materials:
- Ziploc Bag
- Water
- Red Food Coloring
- Sharp Pencils
- Permanent Marker
First, draw a brain on your plastic baggy. If you don’t know how to draw one, then find a picture online (ideally a cartoon picture).
Once you’ve done that, fill the bag with red-colored water and seal it tight. Make sure it’s sealed super tight.
Finally, have your kids stab the bag with the pencils. Any sharp, round object will do, but pencils are a good option. If you go through the bag, it shouldn’t leak.
For maximum grossness, make the water as red as possible. That way when you pull the pencils out, it looks more like blood.
Looking for more fun projects to do with your kids?
Take a look at these six projects that you can have shipped right to your door! Creation Crate comes with components and instructions all in one crate. Best part, each month the crate gets more difficult and teaches a new lesson. Take a sneak peak at what projects you complete the first six months!